Before we start, hello to new subscribers 👋 and welcome! You’re just in time for a mini tutorial!
OK, for those of you with sewing machines and all the other accoutrements, here’s a little challenge for you. For those without, you could do this by hand, pass this on to a friend, or just watch and enjoy 🙂
Step One
Assemble your materials and equipment
Part A
A piece of thin card around postcard size. A postcard is ideal. Get a postcard!
A piece of calico* or plain cheap cotton, slightly bigger than postcard size
Fabric scissors
Sewing machine: normal presser foot, no funny business here
Part B
A couple of reels of thread - one white; one or two blue, any kind of blue.
Some fabric scraps:
pastel blue, pink or white - yellow at a pinch, as long as it’s not green
a couple of pieces of medium/deeper blues: turquoise, navy, royal blue
a piece of cream or stone or unbleached calico*
*by calico I mean the cotton cloth that those in the US call muslin - plain all-purpose cotton
Step Two
Get ready
If you’re like me and have a tangled heap of scraps to choose from, give them an iron 😇
Place the postcard on top of the slightly bigger piece of calico.
Card side up, stitch the two together - yes, stitch around the very edge of the card to fix it to the calico. Lengthen your stitch to avoid too many holes in the card!
Step Three
Join Part A to Part B!
Flip the postcard over so the fabric is uppermost, card underneath.
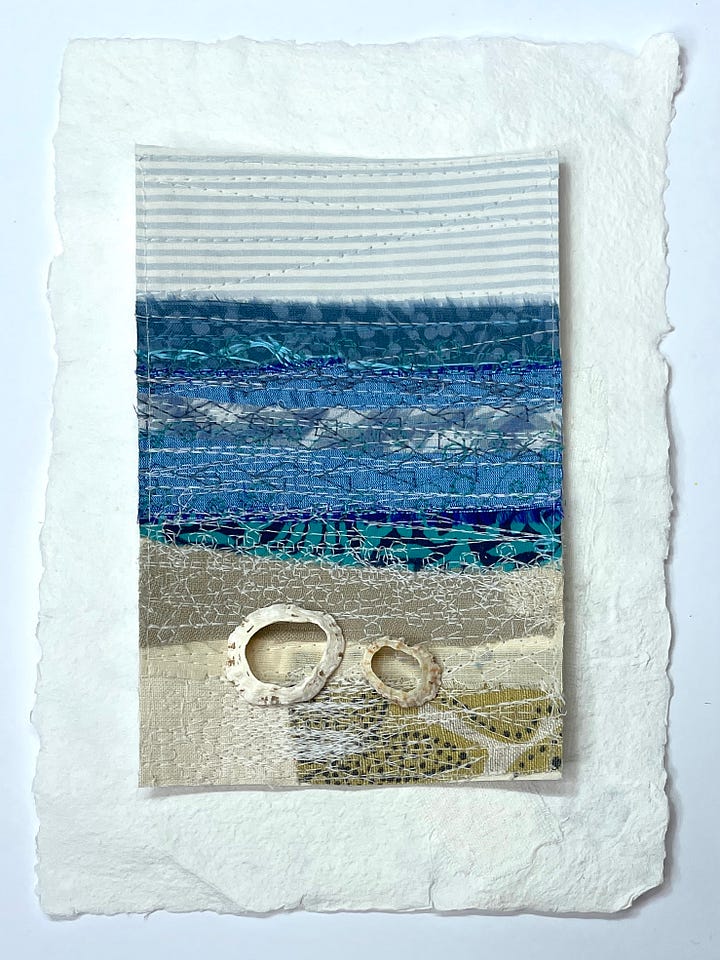
Start with the pale pastel, position it at the top. You should be able to tell where the edge of the postcard is: make sure to position the fabric slightly over the edge.
Then add the cream/natural fabric(s) to the bottom.
Your choice to go portrait or landscape (portrait gives more room to play with colour mixing)
Stitch!
Stitch a few lines across the pale fabrics to hold them in place. I used white thread for this.
Next, stitch a strip of your darkest blue across the card, about a third of the way down from the top. This piece must be parallel to the top of the postcard - check before you stitch it down. This is the only rule!
Add more strips of blue and blue-ish fabrics, covering the whole space in-between the pastel at the top and the cream/natural at the bottom.
Stitch over everything, most of the stitch being on top of the blue area. Use straight stitch, fancy patterns, whatever the muse whispers. Go to town, dig out those preprogrammed patterns you never normally use!
Play with mixing different shades of blue stitch on top of the blue fabrics.
Use white thread and a fancy pattern or two to blend the bottom of the blue with the natural/cream coloured fabric below.
Finish off with a round of stitch (flip it upside down and follow the edge of the card on the back) then trim back the rough edges.
If you’d like some guidelines, stick to simple lines in white at the top, straight-ish lines at the top of the blue with wiggles and pattern as you go downwards, then simple white stitch again near the bottom.
Voila! A little seascape


If you like, you can add shells, beads, some hand embroidery…it can be good to add a focal point, after all. Seagulls? A sailing boat on the horizon?! An enormous whale…?
You can repeat this exercise in different colours and create a landscape, but who doesn’t like blue?! Apparently it’s the world’s favourite colour…
Anyhoo, that was fun, wasn’t it? If you did this, please please show me! We could have a little gallery.
Bit of a plug coming up - scroll to the bottom if you’re skipping this one, or you’ve already enrolled 😎
So…if it’s that easy to make a little seascape, why should you enrol in my Seascapes course?
The little exercise above has hopefully shown you a glimpse of what you can create using very simple sewing techniques. But it’s just the tip of the iceberg! Hopefully the sea’s not that cold…
🐠 Add a layer of collage, some a lick of paint, then delve into your stash of scraps…those silk sari strips we all hoard? Yep, them - with a little muslin or scrim, some ripped cotton, and we’re in business to start creating a fantastic, textured seascape, so realistic you’ll want to dive right in.
🐠 And yes - the stitch can be as easy as in this little exercise. You can get away with avoid free motion altogether, if it makes you queasy - or you can let me teach you how to do it! It really isn’t difficult, just a matter of practise. Worried about loops and wiggles? It’s all part of the texture and movement in the waves, right 😉 ?!
🐠 Whether you’re confident with your machine or just learning, I can also show you some neat tips and tricks to add even more texture and oomph using all those other embroidery threads and yarns and beads and bits I know you’ve got kicking around.
🐠 Prefer to hand stitch? The bulk of the course is stitching with the machine, because that’s what I do and what I teach, and there’s a lot of layers happening so we need the machine to create the main event. Hand embroidery definitely has its place in this course (more is more, right?) but it’s not my focus or the main technique.
🐠 Ever wanted to learn how to construct Celtic knots? There’s a whole section showing you how to do just that, plus different ways you can add them to your seascape, to add a focal point. Or how about adding some text, a line from a favourite poem or quote? A bit of image transfer? That too.
🐠 Then to finish off, I’ll show you different ways I’ve finished and mounted or framed my work, so you can choose which one suits your seascape best.
In other words, it’s a complete mixed-media machine embroidery course
You can join and make a mixed-media seascape (or three or four)
Or you can join and learn all my favourite mixed-media machine embroidery techniques, and apply them to your own projects.
Or you could go crazy and do both!
Use the discount link at the top of your subscriber email to find out more and get 20% off - valid until the end of Sunday June 16th.
Can’t find the link, or have questions?
Plug over!
Seriously, whether you enrol or not, if you do this little scrappy seascape exercise please send me pics!! I’d absolutely love to see (and with your permission, I’ll share them here so others can be inspired, too).
No news is good news
There won’t be a newsletter for a couple of weeks, but for an exciting reason - I’ll share more another time. You know I will, and I’m sorry if it’s all a bit much sometimes 🥹…life can be simultaneously utterly fascinating and absorbing and difficult for me and the edges blur…
Until next time, keep those hands busy and show me later what you’ve been up to!
PS DON’T FORGET the deadline to use your subscriber discount if you’re interested in the course but need time to think. Need me to ping you a reminder?
Make sure you’ve toggled online course news and updates ON and I’ll send a quick reminder next weekend. We start on Monday 17th! Can’t wait!


What a fabulous tutorial! I went ahead and shared to my facebook feeds - I know some of my friends would love to get acquainted with you also. Thank you for the inspiration!
that looks like a great little pick me up when the creative bug has been eaten by a bird. Unfortunately for me, all my fabric is packed in boxes right now. I have my machines and tool (but no thread) where I can find it, but everything else is in the garage at the new house. it will be a few weeks before I can do anything fun.